It is the END of Dry (ish?) January, and you know what that means…. well, for me it means I will make pasta and drink wine. What better way to celebrate the completion of a commitment? With the January we had here in America, I think completing that commitment deserves a celebration! A nice red. Yes, that sounds nice. But seriously, making pasta is a commitment. A time commitment AND a commitment to the ups AND downs (inevitable, unfortunately) of doing this from scratch. It is also a great mindfulness practice, centered in the heart. As the snow falls, today? Today we make ravs. And friends, not all pasta doughs are the same. Let me help you fall in love with RAVIOLI.
This post is for your basic filled pasta dough. It is an egg dough, so if you have those farm fresh eggs around, get ready for some GOODNESS. (It’s also a great way to catch up on consumption, if you have a backlog of butt nuggets LOL)
As a bonus, the clarity of this January has given me some new pasta inspiration. We have been adjusting our eating habits, adding in new exercise routines and yes – consciously deciding to not create food waste. But leftovers can be…..well – BORING. I suspect some yummy leftovers will be around after the Big Game parties this weekend, and I expect to put my new love of Ravs to FULL USE.
And today, I decided that I was going to take two things I love to do: eat and make pasta (then eat said pasta.. so I guess, three things?) and smoosh them into this newfound commitment to less waste.
First off, if you have never made your own pasta THIS POST IS FOR YOU, TOO! It seems like a tough challenge, and it is a bit awkward when you first start/try, but it is one thing that is so gratifying that you will want to make this part of your monthly kitchen routine. There are a million ways to do it. You DO need the right tools, and the basics are perfectly fine…. They really just 1. make it easier to get more complex or 2. help you whip out a TON of pasta faster. The most important tool being your roller. While rolling pasta out by hand is possible, getting your sheets down to a consistent thickness requires a proper roller (no fear, though, there are tons of choices out there… it will just depend on how often you will use them, and your commitment to keeping up the choice to own this part of your food supply.)
We will tackle a basic ravioli dough recipe and then a few fillings. Believe me when I say, once you make homemade pasta the first time, you will be sucked in. If you want to pre-make the filling, click one of the links below and make up to a day in advance. Otherwise you can make the dough and click through to make a filling while the dough rests. They are pretty quick to come together!
Ingredients:
Basic Filled Pasta Dough (enough for approx 5 dozen small ravioli)
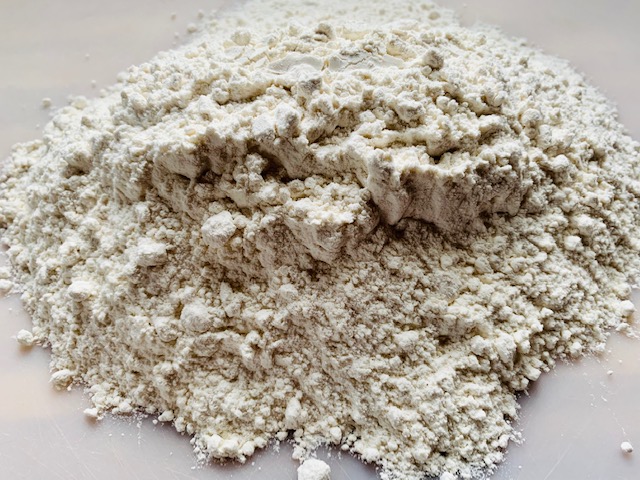
- 360g of OO flour (you can use all purpose, but 00 will give you the best quality pasta due to the fine mill… think of the difference between regular pasta and whole wheat. 00 is SUPER fine and makes smooth, elastic dough that is easy to work and has a noticeably better bite!)
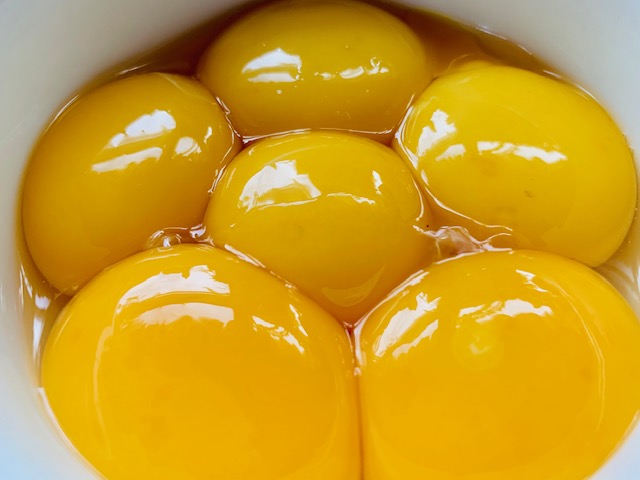
- 2 eggs + 6 yolks (reserve those whites! for either a quick snack scramble or even a new batch of macarons!)
- 1 tsp salt
- 1.5 tsp olive oil
- water (in spray bottle… you’ll understand in a bit!)
Mixed Mushroom & Thyme Filling (Ingredients and instructions in link)
Sausage, Spinach & Ricotta Filling (Ingredients and instructions in link)
INSTRUCTIONS
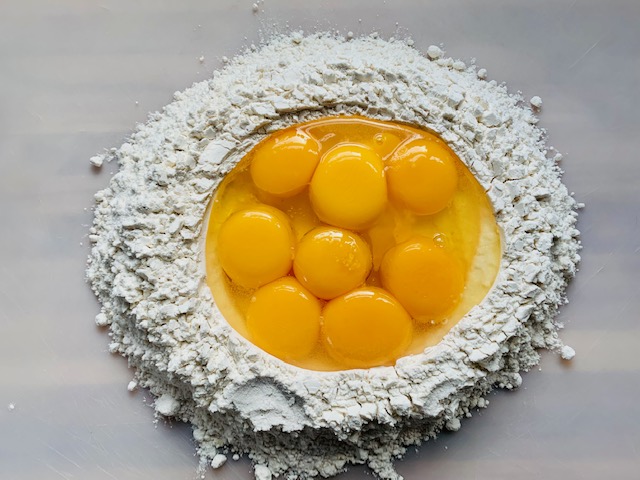
- Weigh out your flour then place on working surface in a mound (if using All-Purpose, pass through a fine mesh sieve first to remove any larger solids)
- Add salt to the top of the mound (this is not an exact science… just put the tsp on top. sprinkled or dumped or whatever LOL)
- Taking the bottom of a measuring cup (or even a small glass) hollow out a well about 5 inches in diameter. DO NOT GO ALL THE WAY THROUGH TO YOUR WORKING SURFACE! Leave about 1/4 inch of flour on the bottom.
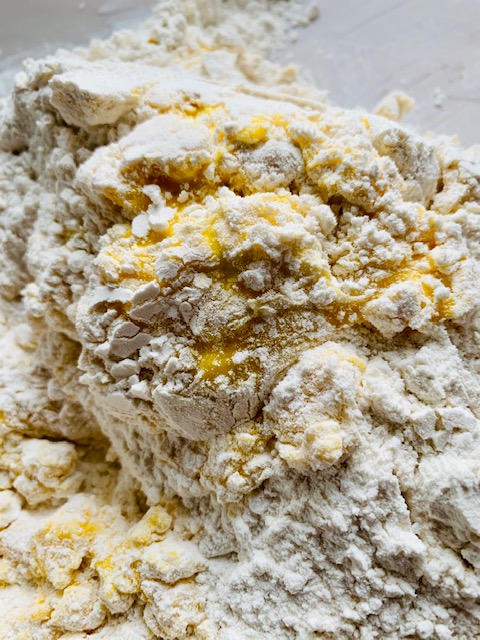
- Add the eggs, yolks and oil to your well
- Using a fork, pop yolks and lightly beat the egg/oil mixture in the well (careful not to scrape the bottom of the well!)
- Once eggs are beaten, slowly start to swirl in the walls of you well with the fork. Again, this is more about your hand control than an exact science. The goal is to SLOWLY incorporate the flour into the egg mix. Again, you do not want to disturb the bottom of the well yet!
- If you get close to ‘breaking down’ a bit of wall, just use your hand to build it back up and continue to widen your well, incorporating more and more flour to the egg…
- Once you get to the edge of the well, and the dough has come together a bit, begin to break the well bottom and incorporate into rough dough.
- At this point, you have a very ODD mix on the working surface. Almost a half loose flour, half yellow, shaggy dough.
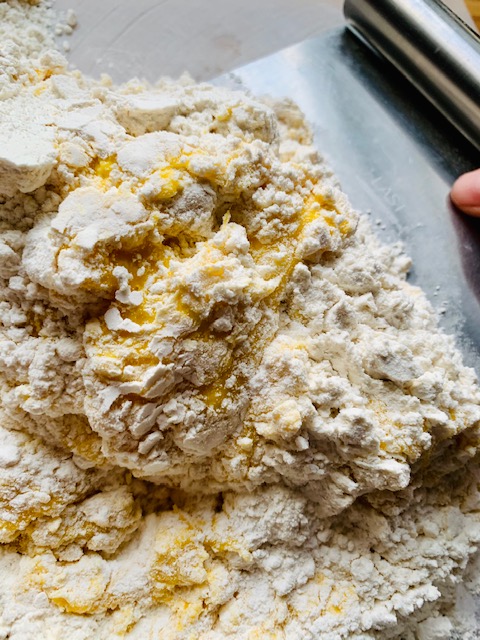
- Using a bench scraper, begin to scoop under and fold over the rough mixture. This helps pull up any egg that might have been stuck to your working surface in the initial mixing.
- Use the bench scraper a few more times to bring the dough together a bit more then, well, get in there with your hands!
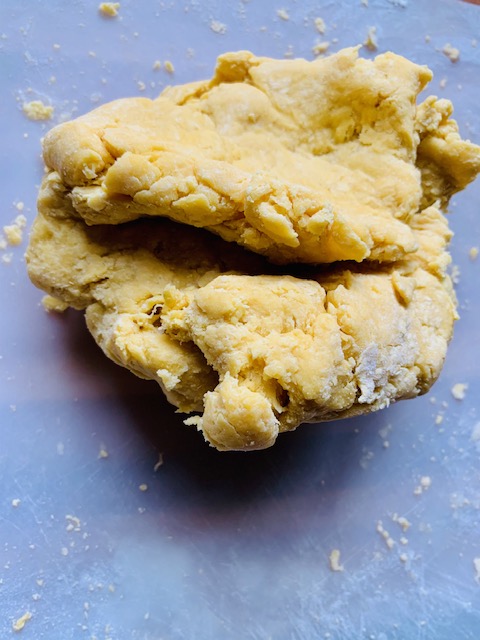
- It is a very odd texture. It will feel VERY DRY (and look like flecks of scrambled eggs in flour.) Keep working through the dough, with your hands, to bring together more. Eventually it will become a more uniform color (yellowish) and you start to see the beginning of what will be your dough. Once you have a very tough, yellow dough, spritz the rough dough ball with water LIBERALLY to continue to bring together. You want to get as MUCH of the flour into the dough ball as possible (and not have any dry bits on your dough ball!)
- Keep working the dough together until you have lump of uniformly (no dry spots) mixed dough on the surface. Scrape away any dry or solids left on your working surface now so you can knead on a clean surface.
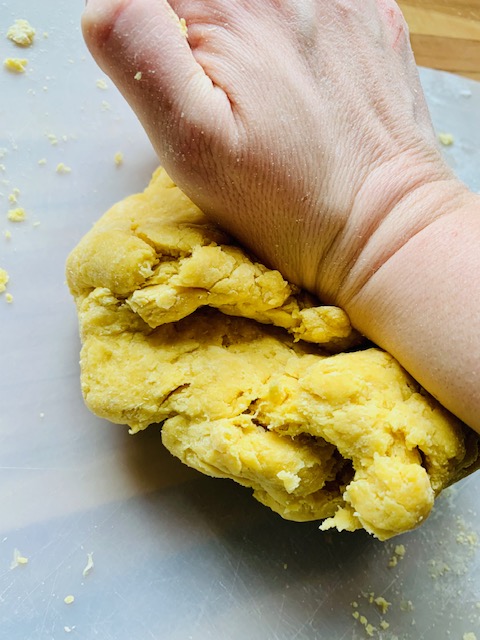
- Now the fun part (sarcasm, folks)- KNEADING this beast of a dough for 10-15 minutes. This is all about the feel. It is HARD, but keep at it. It also feels like you aren’t doing it right. Like, kneading bread dough versus this pasta dough is NIGHT AND DAY different. 2 minutes in, you will consider stopping… it’s good enough… you will check your watch a LOT and wonder if time has slowed. 8 minutes of kneading feels like an hour. 10 minutes? You will question why pasta even exists if it is this insane to make…. *have a small splash of wine…. you can do this* There is no exact amount or time of kneading that is perfect. You have to go by feel. Around 8 minutes or so you will notice the texture of the dough change… it will become more elastic, bouncy and almost has a gloss to it. Keep going a bit more once you hit this point. Unlike bread, there is no way to over-knead pasta dough. BUT- don’t stop until your dough is a bit springy and glossy… you need that!
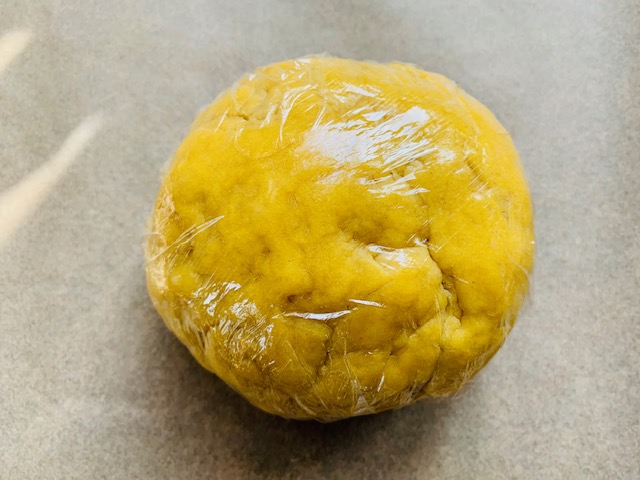
- Once you’ve hit your sweet spot in dough texture, form into a ball (tight, no air pockets if possible) and wrap tightly with a few layers of plastic wrap. If you are using immediately, let rest for a MINIMUM of 30 minutes before working. If you are making your Ravs the following day, place into fridge.
Rolling and Forming and Filling your Ravioli
- Make sure your dough is at room temp before working. This is IMPORTANT! So take overnight dough out of fridge and place in warm area to bring up to temp at least an hour before working.
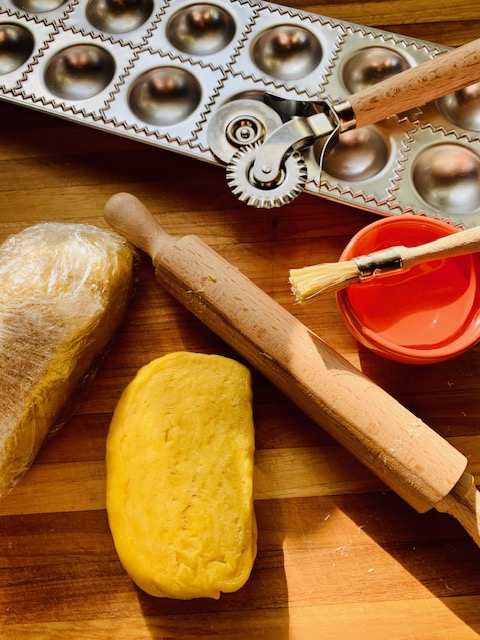
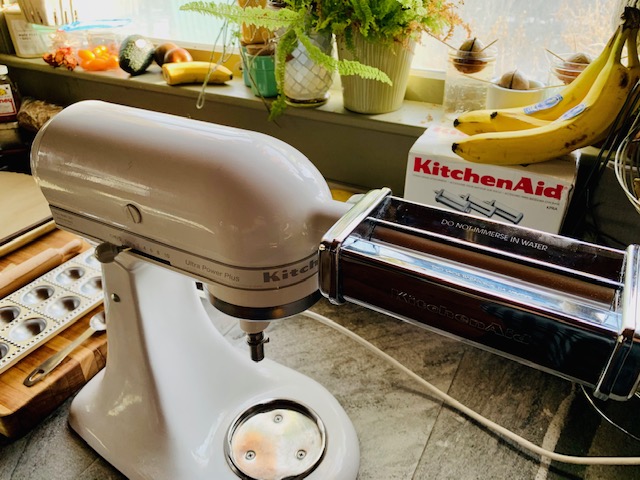
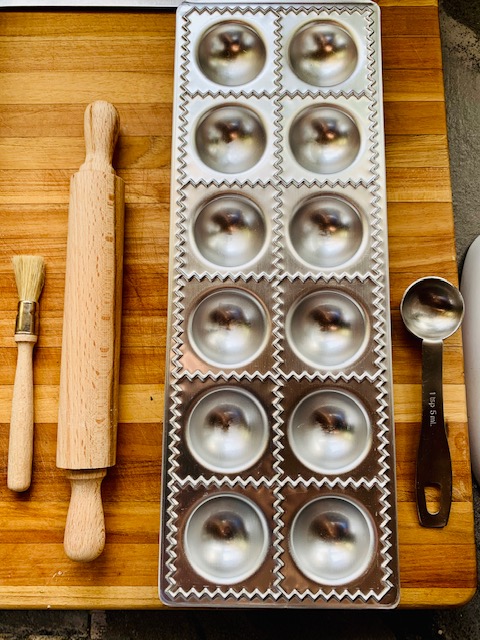
- Gather ALL of your tools before starting. AGAIN IMPORTANT. Once you start, you cannot stop as the dough’s ‘timer’ starts ticking the minute it hits air. It will start to dry out and become unmanageable (and unfortunately, trash in most cases) so get your work area all organized. Mixer, roller attachment, scale, small rolling pin, pasta cutter, pastry brush, ravioli mold, filling, tbsp and tsps at the ready, small bowl with water and parchment lined sheet tray/cookie sheet. It’s a lot, but trust me, when you can just walk to your freezer and pull out a dozen homemade ravioli for dinner? It is time well spent!
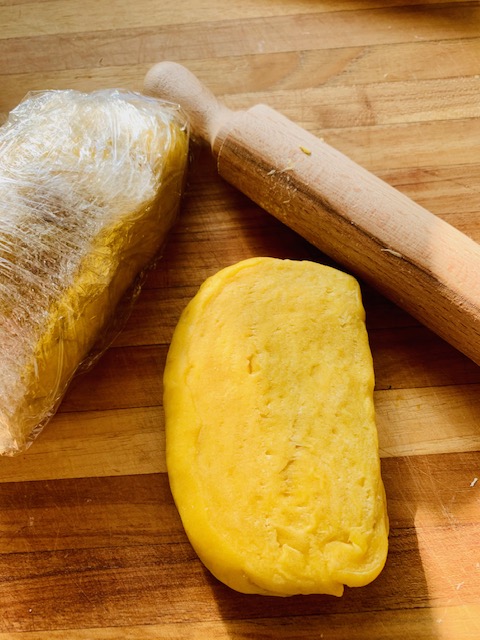
- When ready, unwrap dough ball and cut a section off of it. You are looking for about 110g-115g of dough. This will get you the bottom and top sheets made. The first time you make ravs, this step is a bit of an experiment until you know how much dough you need to make a sheet the right thickness and length. Some folks will say to divide into pieces like a pizza, BUT I choose not to do this to limit the area that I have exposed to air. I just slice off ONE SIDE of the ball, then re-wrap immediately to preserve the moisture in the remaining dough.
- Take your section of dough and form into a small rectangle (roughly the size of your palm) then taking your small rolling pin, roll out into a rectangle that is roughly the thickness of the LOWEST setting on your roller (0 or 1) which is approx 1/4 inch. Keep the dough rectangle slightly narrower than your roller, as when you pass it through and gradually reduce the thickness (go up a setting) the dough will spread. If it gets too wide, it will wrinkle and fold back onto itself and often times wreck that sheet!
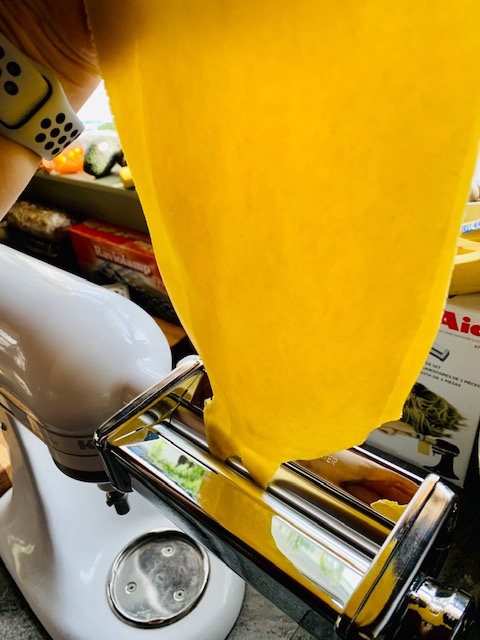
- Now is the ACTUAL fun part: ROLLING! Turn your roller/mixer with roller attachment on LOW and holding the dough in your right hand (over the roller) let it pass through, catching the exiting sheet with your left hand below. Pass it through a few times initially, and fold sheet in half, turn 1/4 rotation and then pass through again. This just primes the dough and gets your glutens ‘working’ for you in the rolling process.
- Once you’ve passed your ‘sheet’ through the lowest setting, you will start to increase the setting on your roller bit by bit, making your sheet thinner and thinner (and longer and longer!) Do not skip a setting! I roll my ravioli sheets with my KitchenAid mixer and pasta roller attachment. It makes the perfect width sheets for my ravioli mold and works flawlessly. As this dough is very dry, there is also no need to add flour to your roller attachment pins… this stuff does not stick and moves through it effortlessly!
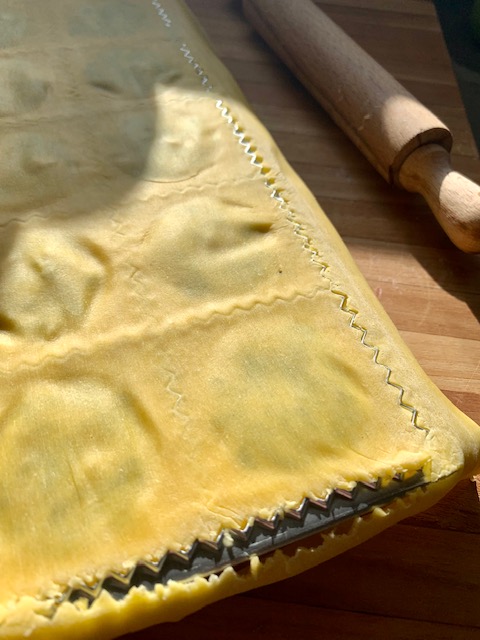
- Continue to roll your sheet until you get to a good thickness for your pasta sheet (5 on the KitchenAid roller for me gives you a great ‘bite’ once the pasta is cooked. I like my pasta not mushy… more on the al dente side. This also helps them retain shape when cooking, and they can stand up to a good ‘toss in the sauce’ so to speak, when you are ready to plate and eat.) You should have a sheet approximately 30-36″ long. Place the sheet, skewed to one side of the length of pasta, on top of your ravioli mold. It should be slightly WIDER than the mold. As the doughs should stretch, the width should ALWAYS be slightly wider. Fold the other half of the dough back over the mold (creating a double layer) if you have made the sheet long enough, the folded sheet should cover the entire mold, width and length wise. If not, you may need to increase your measure of dough at the beginning or take it to a the 6th setting on your roller.
- When you have the right amount of sheet to cover the bottom and top of the ravioli, cut in half, placing the unused sheet close by on the tray. Place bottom layer on ravioli mold, making sure it is both wider and longer than the mold. It doesn’t need to be by much, but as you fill, you will see that it shrinks slightly and you need to make sure that in the end, the dough sits over the crimps. This is what seals it shut when you put the top layer of dough on, so yeah – kind of important.
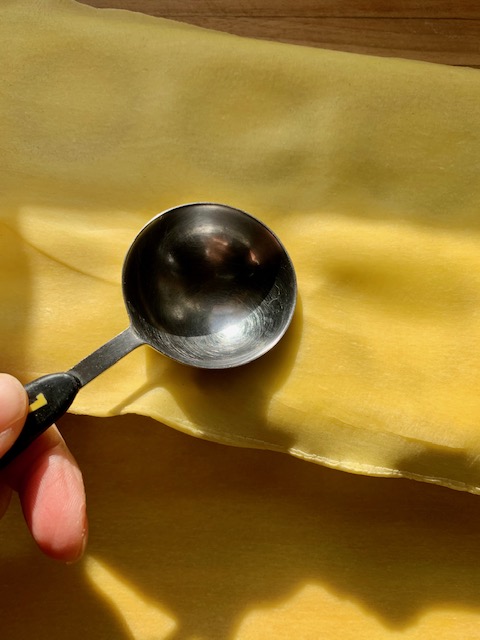
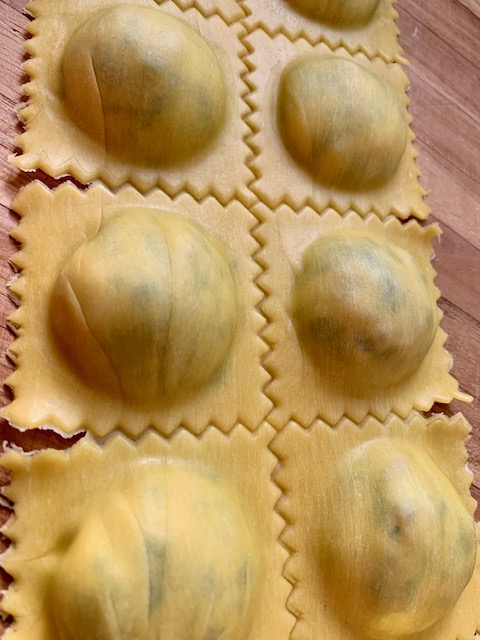
- Once dough is on the mold, take your dry tbsp measuring spoon and use to gently stretch dough into the concave ‘filling’ sections of each ravioli. The dough is elastic so a gentle push should stretch it to fit, not break it. It will spring back a bit but that is ok… when the filling is added it will re-stretch.
- Taking the tsp measuring spoon, fill each section with approx 1 tsp of your filling of choice. With SUPER smooth fillings, you can opt to use a piping bag, but anything with texture (meat, mushroom etc) I suggest a tsp. It is important to NOT have the filling overflow the little wells you created. 1 tsp of filling will sit a bit above the top of the tray, but will push down and fill the proper space when the top goes on. Anything more, you risk rolling the filling OUTSIDE of the little concave sections and over the crimping… which can cause your two layers of dough NOT to fuse together fully .. and when boiling, cause your ravs to break apart. You want a pocket of filling, surrounded by two layers of dough. For more filling, in a future post, I will be making larger ravioli without a mold.
- Once all sections have their filling, take your finger or small brush and run a thin coating of water along the crimping/borders of each ravioli. This step is like setting the glue that holds the top and bottom pasta layers together.
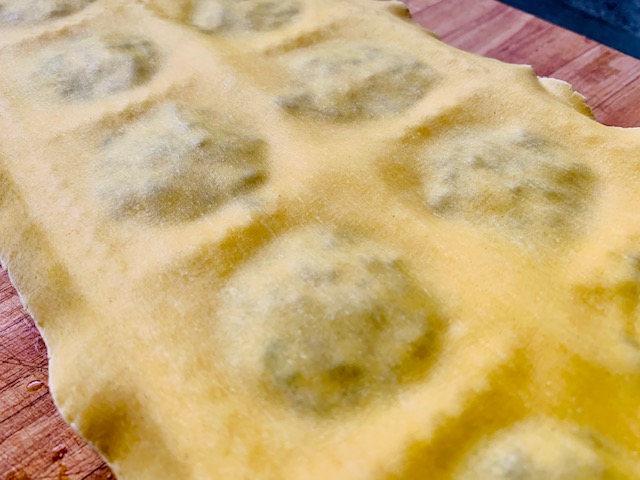
- Now, take the reserved top layer of sheet and hold over the mold. It may have shrunk a bit (remember: elastic dough? it will ‘spring’ back a bit) so you MAY have to run this back through the roller again to get it back to the appropriate length. Once ready, place the top sheet over the filling, again making sure it is slightly wider and longer than the mold.
- With your hands, gently press down over each ravioli section. This gently stretches the bottom layer and lets the filling fully fill the well. Your goal is also to get all air pockets out of the filling wells. Don’t push harder if you find there is a troublesome bubble, this risks breaking the bottom layer. Instead, gently pull up the top layer close to the bubble and smooth it out.
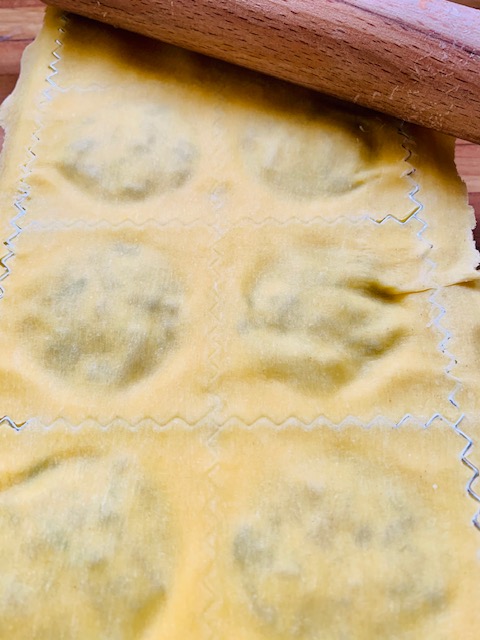
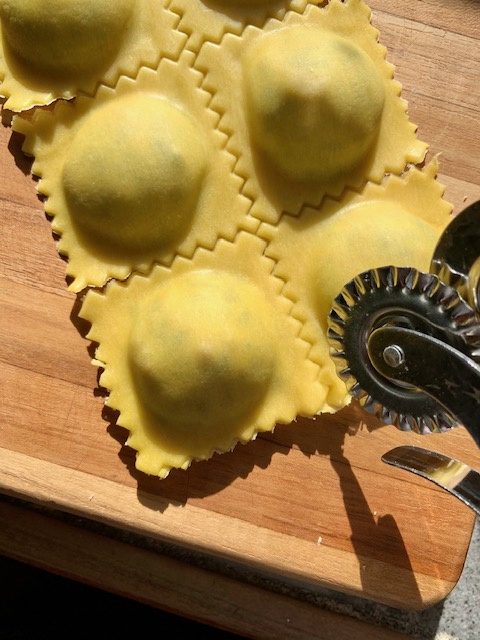
- Once you have your filling wells full and free of air pockets, take your small rolling pin again and take over the top. This ‘CRIMPS’ and creates your individual ravioli. If you over filled your ravioli, you will see how the filling will be pushed into the crimps. Take note and reduce filling next batch. Keep rolling until your crimps break through on the outer borders of your mold tray. Then take roller and go over the cross sections to get them through (or close to through).
- Turn tray over and tap one end gently on the baking sheet. It might require a few taps, but eventually the ravioli will gently slip out of the mold. ***Because this dough is dry, this step is easier than some other doughs. It also does not require you to flour your mold (which means your ravs come out of the mold ready to cook/freeze without any extra flour on them… extra flour = bad… it causes the cooked ravioli to be almost slimy and also will impact your sauce retention etc..)
- Finally, separate your ravioli by hand (if each edge fully crimped and they can easily be separated) OR run your fluted pasta cutter along the crimping to separate.
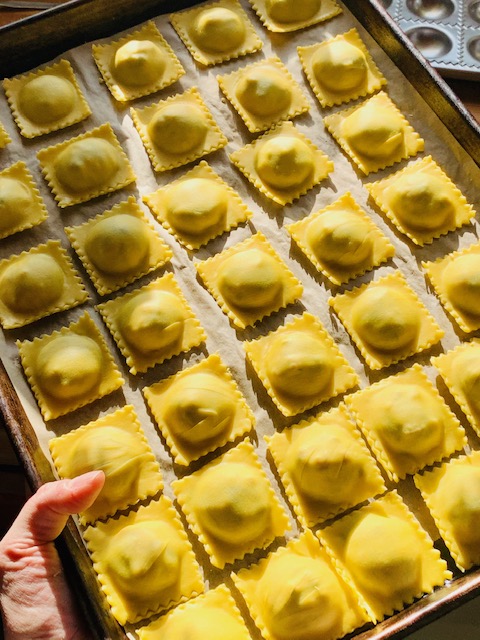
- Space slightly on your lined baking sheet and repeat the process for the total amount of your dough/filling. (note: the dough should make roughly 5 dozen ravioli. Each of the filling recipe’s I reference also make roughly 5 dozen ravioli. The Mushroom filling makes slightly more, which I reserve for a small lasagna roll bake-up for a weeknight dinner.)
- Once you’ve used all your dough and made your full complement of ravs, you can cook immediately (whichever amount you like… hubby and I usually have 6 each) OR freeze.
- TO FREEZE, leave on tray(s) and place full sheet tray(s) into freezer to allow ravs to freeze individually. Once frozen, place in airtight freezer bags by servings. I like to freeze flat (both wet and dry items) when I am not using my vacuum sealer, so a quart freezer bag perfectly holds 12 ravioli flat. Maximizing your freezer space!
- To cook, bring a pot of salted water to a boil and add unfrozen ravioli to rapidly boiling water. Cook until ravs float to the surface. Toss with your favorite sauce (red, white, brown butter, lemon garlic white wine… SO many options) and enjoy! Take frozen ravs out the night before/morning of cooking and place in fridge to defrost. 🙂


While I love the homeliness of baking and the smell of freshly baking bread… NOTHING comes close to the romance that takes you over with pasta making. It is a commitment yet, it TRULY is an art. One that challenges your senses and creativity in a way that baking somehow does not. The best word I can use is romantic. I’d say sensual, but that’s weird. LOL. It is one of the most tactile cooking experiences that I can think of…. even making dumplings by hand doesn’t compare.
Once you make pasta that first time, you fall in love, and that love comes through in how you work the dough, shape the pasta, fill the pasta and eat the pasta. Somehow…. pasta making is just so much …….. MORE.
For some, it is a practice from the old world that has familial importance… traditions to bring forward with us as time marches on. For some, it is a way to let your inner artist out. Still others love it for it’s simplicity and substance. And then there are those who use the practice for quiet, reflection and mindfulness. As much as my last post was about overcoming fear, this post is about embracing your kitchen as a therapist and mentor. Yes, some kitchen projects take time, but the commitment (much like a great relationship) blossoms into something quite incredible and VERY rewarding. 🙂
A quick recommendation if you love cookbooks as much as I do. These two pasta books are amazing. One for its recipes, the other for the love of the shapes and how to craft them. I highly recommend them both.


Some Great Pasta Making equipment available that helps crank out the ravs:
KitchenAid Pasta Attachment This is what I use for anything requiring a sheet (they also have an extruder, but that is for a future post!) This roller set has 3 rollers (sheet, spaghetti and fettuccini) and honestly, I use the spaghetti roller for homemade ramen noodles and the fettuccini for egg noodles 🙂 The sheet is the most used roller, as you use this for hand cutting your own pappardelle, making everything from tortellini to farfalle, paccheri to agnolotti… and many other shapes. This is for those of you trying to get EVERYTHING out of your KitchenAid mixer.

Pasta Roller, manual This is for those of you who don’t have a KitchenAid mixer, or who have space to store another piece of equipment! (Full disclosure, I may invest in one if I get sucked in DEEP to the pasta making world, much to my husbands chagrin…) The electric ones are expensive… and bulky. If using a manual roller, you just need a bit of practice rolling the dough as it requires you to feed the dough with one hand, and then crank & guide the pasta sheet with the other.

Ravioli Mold, 2″ This is what I use and honestly, kits with the other shapes seem nice, but this puts out 12 perfect ravs in no time and 6 of them is about the perfect amount for a dinner with a side salad and bread. Most homemade ravioli fillings are VERY rich… these are not just cheese ravs! Again, like most special ‘from scratch’ meals, you savor them… if you like having a ton of pasta on the plate, this company has a bunch of molds for smaller (up to 24, 1″ squares). I also prefer the stainless molds to the plastic/metal ones. I always felt like the plastic round mold I had required oiling/flouring… it seems like any dough I used just stuck… which ruined half of them.. ![]()

Pasta cutting tools This is a great little set which has a fluted cutter as well as 3 stamps (for making ravs without a mold.) The stamps crimp your edges on a raw sheet. I do not use this method as I feel I waste dough doing it this way.

Pasta brush Now, I used to think that I didn’t need different brushes, but now I know… like in cosmetics – BRUSHES CAN BE CRUCIAL! These are great for cleaning coffee/spice grinders, cleaning your pasta maker (sometimes dough does get stuck) and yes, are great for egg washes in baking, or even applying water seals on your ravs! Here is a great set that takes care of a bunch of your needs in the kitchen. I have a few I’ve collected, but this set has the sizes I use frequently.

Start your romance with pasta. I challenge you. Yes, can you buy it at the store? Of course. And maybe with basic noodles I would agree… however, RAVIOLI? This one you should OWN. Control the ingredients in your ravs! And, maybe even save some leftovers from the trash bin in the process.
I hope to make some AMAZING ravs once we start smoking ribs again…man, the rabbit hole you go down is DEEP, friends….
Thinking of the options off the top of my head? Sweet Corn, Ricotta and Chili Ravioli tossed with a lemon, garlic sauce and Grilled Shrimp?
Yeah…. sign me up.
Make that pasta, people! Make it and fall in LOVE.

Looks delicious 😋
LikeLike
you give Italian cooking real zest, love your enthusiasm, amen
LikeLike
Thank you 🙂 I love all cooking, but Italian cuisine has a special place in my heart. From my personal history of family spaghetti dinners every Sunday at my grandparent’s house, to my time in NYC eating as much and as well as I could… it’s hard NOT to be in love with pasta!
LikeLike